|
|
 6th January 2009, 05:07 PM
|
#1 | ||
|
Senior Member
Professional user

Join Date: Mar 2005
Location: Phoenix, AZ
Posts: 917
|
Quote:
Quote:
As for the red lines, that indicates a surface that can't be triangulated. Often it's caused by edges that intersect themselves or vertices selected in the wrong order when creating a surface. Select counter-clockwise: 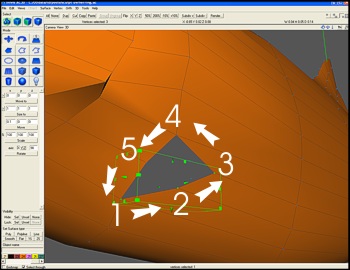 (Left) Result from wrong selection order. (Right) Result from correct selection order 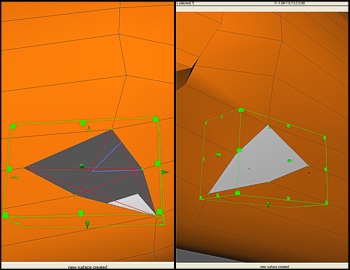
|
||

|

|
|
6th January 2009, 10:48 PM
|
#2 | |
|
Junior Member
Member
Join Date: Jan 2009
Posts: 20
|
Quote:
Now I still need to talk about curving lines again. I changed the view as you suggested and it worked, in that the lines are also now curved in the 3D window, so that's good, but when I apply a surface to it it draws it to the point, and not along the line....do you know what I mean? It seems I need to add more and more points for it to draw the line curved....is that the only way? Maybe let me put it another way...... What ways are there to draw a perfect curve that will show up curved after I apply the surface? Can you walk me through that? I suppose one way it to plot a line from A to B, then I can add another vertex in the middle and pull that away to create a V shaped line. I subdivide that and it's nicely curved. But it won't fill in right, so I add more vertecies, but then it's no longer a nice smooth curve....it's changed. I am also trying other programs that you can plot point A and then point B and arc the line in all kinds of infinate ways till you place point C, is there anything like that in this program? Thanks again! Wes |
|
|
|
|
|
7th January 2009, 07:07 PM
|
#3 |
|
Senior Member
Professional user
Join Date: Mar 2005
Location: Phoenix, AZ
Posts: 917
|
Hmm. I'm not sure if I completely follow, can you post a picture?
There are a couple of different options for adding points to a shape after you've created it. Slice surface is handy, as is the knife tool. Probably the best tool is a plugin called "divide loop" that you can download here if you don't have it already: http://supercoldmilk.com/ac3dplug/divloop.html I made this short video showing some of the tools, maybe this might help: http://www.independentdeveloper.com/files/curves.wmv Oh, also the spline tool is also handy for creating smooth lines. |
|
|
|
|
7th January 2009, 11:56 PM
|
#4 | |
|
Junior Member
Member
Join Date: Jan 2009
Posts: 20
|
Quote:
When I tried the same thing mine doesn't work. I did like you and laid down 3 vertecies, and then chose the Object and tried to add subdivisions, but my top left view didn't change, as seen in the first picture below. I think it was fine yesterday, but now....? In the second picture I am showing how even the 3D view, which "accepted" the subdivisions, still filled in to the pointed middle point. This is a bit different than what my other model did, but it gives you an idea what I was trying to describe. Sorry to get you bogged down like this.....but thanks again.  Wes |
|
|
|
|
|
8th January 2009, 05:44 PM
|
#5 | |||
|
Senior Member
Professional user
Join Date: Mar 2005
Location: Phoenix, AZ
Posts: 917
|
Quote:
- I draw a polyline using the polyline tool - I subdivide the polyline to 3 division levels using Object > Subdivide + - I extrude the polyline in the top view to give it depth. - I temporarily turn off subdivision preview so I can see the underlying control mesh. - I convert my shape from polylines to polygons; there's an extra surface that only shows up as a polygon. - I delete the extra surface to smooth out the shape. - I switch subdivisions back on with the 'd' key. - I switch to vertex mode, and just play with the curve a little. - I select two vertices along an edge and using Vertex > Insert Vertex, I add a new vertex to the surface. Then I repeat for the opposite edge. - I select the two vertices I just added, and click Vertex > Slice Surface to cut the surface along the line formed by the vertices. - This gives me another control point, so I play with the curve some more. - I select some vertices along the front of the shape in counter-clockwise order, then use Vertex > Create Ordered Surface to make a new surface. I do the same thing again on the back of the curve to give it some volume. - Finally, I select a row of surfaces along the middle of the curve and use the "Divide Loop" plug-in to slice the whole row in two. Quote:
Quote:
|
|||
|
|
|
|
8th January 2009, 07:37 PM
|
#6 |
|
Junior Member
Member
Join Date: Jan 2009
Posts: 20
|
Thank you again so much. I don't know if I'll have a chance to try it tonight,
but as soon as I do I'll let you know. Again, thank you very much. Wes |
|
|
|
|
9th January 2009, 12:19 PM
|
#7 | |
|
Junior Member
Member
Join Date: Jan 2009
Posts: 20
|
Thanks again Lisa, and ya, I had hit that 'd' button. I use 'Alt Z' to delete a lot and must have struck it in my madness....hehe.
Quote:
I even tried the Poly and Polyline buttons and it didn't help. I have to admit, I'm not sure what the purpose is of the rest of the steps...are they required everytime I want to make a 2D curve? So to recap, to make my little Ice Cream Cone, I do the above and get it nice and rounded. I can even get it to look ideal in all views. Then I add the bottom part, the V. I select it all and add a surface to it, but no matter how I do that, it's always a point at the top. I cannot see another level or part, it looks like a cone in wireframe, but when it fills in it looks just like the screenshot I posted earlier. Any idea how I can make my little cone? Thanks! Wes |
|
|
|
|
|
11th January 2009, 04:42 PM
|
#8 | ||
|
Senior Member
Professional user
Join Date: Mar 2005
Location: Phoenix, AZ
Posts: 917
|
Anytime!
Quote:
Quote:
But here's how I'd do it: - Draw a 3-point polyline to make the curve at the top of the cone. - Extrude the polyline. - Select the entire object and switch the surface mode from polyline to polygon and delete the extra front or back-facing surfaces. - (Optional) If you want the cone to have a super-sharp point, select Object > Commit Subdivision. This will lock the subdivisions in place as they are, making them uneditable, but will allow the rest of the shape to be non-curved. Otherwise, if you don't want to commit subdivisions, you can still make the cone fairly pointy by adding a second set of vertices near the tip. - In vertex mode, highlight the two vertices at the top edge of the curve and select Vertex > Extrude Edge. Drag the vertices down to make the point of the cone. - Repeat using the bottom two vertices. - (Optional) To weld the point of the cone, highlight the two vertices on the left and click Vertex > Snap Together. If you have a lot of vertices, you can also use "Snap Together by Distance" with an appropriate radius to do several at one time. Repeat for the right side. Then click Object > Optimize Vertices. I also recorded two quick videos to illustrate better. With committing subdivisions (super-sharp point, but non-editable): http://www.independentdeveloper.com/...commitsubd.wmv Without committing subdivisions (editable curves): http://www.independentdeveloper.com/files/nocommit.wmv Note: the closer you move the two points together at the tip, the sharper the curve. Also, it was completely sharp before I welded it, all depends on what you want to achieve. |
||
|
|
|
 |
|
|


 Hybrid Mode
