|
|
|
|
Noise for AC3DReleased under the GNU LESSER GENERAL PUBLIC LICENSE. Latest release (version 1.1) * NOTE: Courtesy of AJ MacLeod, this Linux version was compiled and linked on a Debian 3.0 install. If this does not work for you, the source code has been proven to compile/link under Linux, so you may wish to download the source code and compile for your system. * NOTE: Courtesy of little_penguin, this Linux version was compiled and linked on a Debian Sarge 3.1 install. If this does not work for you, the source code has been proven to compile/link under Linux, so you may wish to download the source code and compile for your system.
HistoryVersion 1.1
Applies random movement or rotation to the current selection. This plugin and code are freely distributable AC3D versions prior to version 5 have not been tested with this script.
DescriptionApplies random movement or rotation to the current selection. Noise is selection context sensitive. For example, when in Vertex mode, random Moves will be unique for each vertex, while in Object mode, random Moves are applied to each object as a whole.
InstallationCopy the noise.tcl and noise.p files to your AC3D plugins folder (for example, if using Windows, C:\Program Files\AC3D5\plugin) and (re)start AC3D. You will find the "Noise..." menu item under the "Tools" menu.
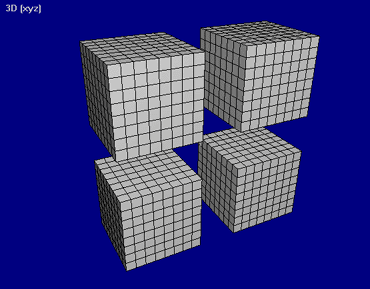
Example : The Move utilityThe Move utility moves groups, objects, surfaces, or vertices randomly, depending on the current Select mode. The select mode has a significant effect on the result of the Move command. The distance moved is expressed as a range of units. For example, if you specify "1" unit, this means that a random movement between -0.5 and +0.5 will be applied to each selected element. This example uses four cubes. Each cube is a 1x1x1 unit box. The cubes were divided 3 times each (using Surface | Divide), and were arranged as shown. The two cubes on the right side have been grouped together using Edit | Group. With all 4 boxes selected, a Move was enacted in each of the 4 select modes, with the following results.
The following is an example of moves in vertex mode with subdivision applied. The cube is similar to one of the cubes in the previous examples. The sphere is not actually a native AC3D sphere. You may find that if moving vertices in a standard sphere, the top and bottom of the sphere will "pinch". This is caused by the way the triangles are arranged at the top/bottom of the sphere. To get this more natural looking, stone/asteroid-like sphere, I used the Tools | Create polyhedron... utility that ships with AC3D. This is a rather intimidating utility, and does call for experimentation unless you're somewhat geometry/poly savvy. The steps to achieve this shape were:
You should then have a cube similar to the one above. If you do not care for the results, you can Undo and try again. Also, you could have performed the Subdivision (step 6) before applying the noise - this allows you to experiment a bit more easily.
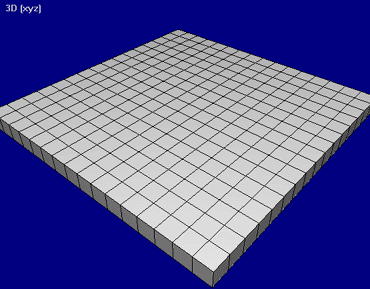
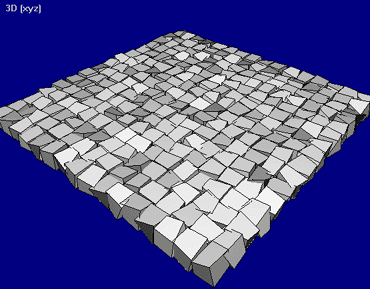
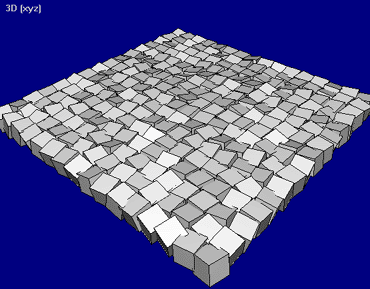
Example : The Rotate utilityThe Rotate utility rotates geometry randomly. Rotation is always based on the center of the group (in Group select mode) or the object (all other select modes). Rotation is specified in degrees. This example uses an array of 256 cubes, arranged as shown. Unlike the Move example, each "square" is a distinct object. With all 256 boxes selected, a Rotate was enacted with the following results.
|
| All content Copyright © 2006 Dennis Hawthorne, except where explicitly noted supercoldmilk © 2006 Dennis Hawthorne |
||