|
|
|
|
Tin can tutorial : Making a tin canMaking a tin canThis tutorial will show you how to make a tin can like this one in AC3D using just a few steps.
You can download the can in this example here
Step 1 : PreparationTurn on the AC3D grid (using the "Gridsnap" checkbox in the lower left of the AC3D window). Set the grid to whatever you'd like. I used a Major grid of 1.0 and a Minor grid of 0.05. You can set the grid size using the File -> Settings menu.
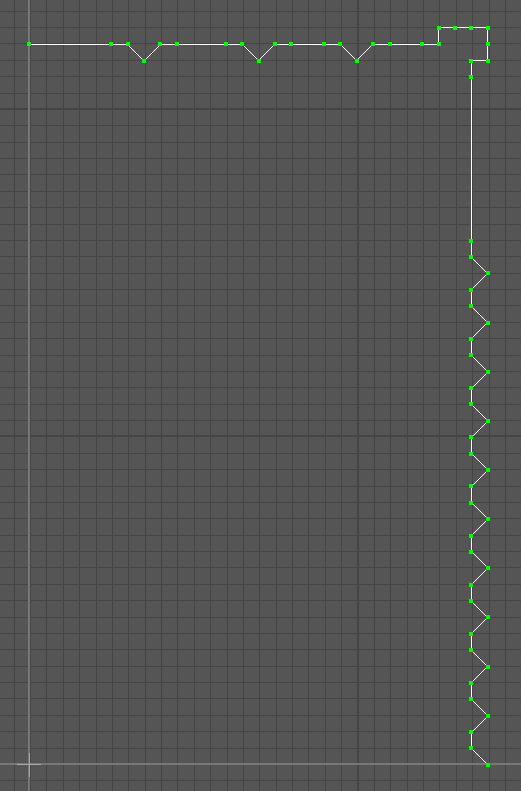
Step 2 : Drawing the can profileClick the "Line" button on the left hand control panel. This will activate line drawing mode. Draw a line which will be the profile of our can as shown below. Draw the line by clicking on the grid in the appropriate places. End the line by right clicking.
You may notice that some of these points are right next to others in a straight line. This will help the can maintain a less organic shape when we subdivide the can in a later step.
ImportantMake sure the left side of the profile of the can is at zero on the horizontal (X) axis, and at zero on the vertical (Y) axis, as shown in the image. This will be important for the next steps.
ImportantDo not close the line on the left or bottom sides.
TipIf you mess up and place a line point where you shouldn't, don't worry - you can always go back and move any errant points later.
TipIf you zoomed in too far before starting the line, or you need to continue your line drawing outside of the current area, use the arrow keys to pan the view up/down/left/right, and Ctrl+up/down to zoom in and out while you stay in Line draw mode. This is a tip for those who normally use the middle mouse button to pan the view (like I usually do); if you do that in Line mode, you will exit line drawing mode.
Step 3 : PositioningIf you did not place the leftmost points/vertices exactly on the X axis in Step 2, or you did not place the bottom of the profile exactly on the Y axis, move the profile there now. Your tin can profile should look pretty much like the one above. In Vertex mode, select the leftmost vertex and perform a Vertes -> Align to Axis -> X. Select the bottommost vertex and perform a Vertes -> Align to Axis -> Y. This simply ensures that the vertices are directly on the axes. Unless you changed the position of your 3D cursor, the entire shape should already be on the Z axis. If you don't know what this means, this means you probably didn't change it, so you're in good shape here. If, however, your profile isn't sitting on the Z axis in the Left or Top views, put it there now.
Step 4 : MirroringSelect the half-profile you've just created in Object mode and perform an Object -> Mirror -> -Y. You could also use "Y axis" here, since our object is already at the Y axis. As you can see below, this turns our half-profile into a full can profile.
Step 4 : "Rounding out" the canWith the can profile selected, perform an Object -> Revolve, using the settings below.
Step 5 : Smoothing the shapeThis is a sharp, clunky can at this point. Easily fixed using subdivision surfaces. With the can selected, click the "Subdiv +" button along the top (below the menu). Click it twice for best results. You could, alternatively, use the Property window (F9) and set the Subdiv preview to 2. Here are the results of the subdivision, with the non-divided object on the left.
If you're going for a higher resolution can, you can always increase the number of segments before Revolving. 6 will suffice unless the can will be rendered very close-up. You can download the can in this example here |
| All content Copyright © 2006 Dennis Hawthorne, except where explicitly noted supercoldmilk © 2006 Dennis Hawthorne |
||