|
|
|
|
Fur tutorial : Fur basicsThis tutorial is part of a series on using the plugins I've published for AC3D. Get the fur plugin here. The tutorial is divided into two parts - Making grass and Making hair (this page).
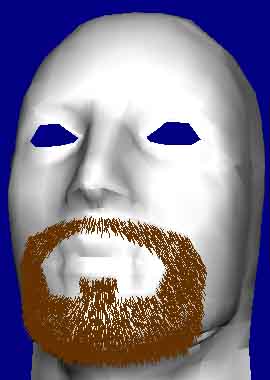
Making hairThis tutorial will show you how to make hair like this in AC3D using just the fur plugin and a few steps.
The head in this example ships with AC3D.
Step 1 : PreparationLoad the "head.ac" sample that ships with AC3D for this test. It is located in your AC3D installation directory under models/samples. In surface mode, select the vertices around the mouth as shown here. We're going to create a goatee for our head.
Step 2 : Creating the beardAssuming you have installed the Fur plugin, open the "Fur..." menu item under the Tools menu. You will immediately see some new "fur" on the head, but it will not look at all like we want.
This is simply a preview. While the preview is active, you cannot interact with AC3D except through the plugin interface. If you want to rotate/move the view to get a better view of your rectangle, simply uncheck "Realtime updates" (the sample fur will disappear), make your interface changes, then check "Realtime updates" again. With the preview enabled, make the following changes. 32,000 hairs can a *lot* of hairs, but keep in mind we're not covering an entire unit. We'll end up with about 9500 or so hairs out of this. When I create hairs in the preview, however, I like to set the "Sides per strand" equal to 1. this draws the hairs much more quickly for faster previewing, then before I finally create the fur, I set it to my desired number of sides (usually 2 for textured hair/grass). However, this model is only getting line hair for now:
When you are satisfied with the beard, click "Create fur". This creates and selects the fur, and pulls you out of realtime mode. We're done with the fur window, so we can close it now.
Step 3 : ColoringAll that is left is to color the beard. With the beard still select it, edit/create a material of your choice.
As you'll see, you need a lot of strands to create hairs out of lines and still get decent coverage. Looking at the grass texture, we see that we can get much better coverage with less geometry using a 2-sided surface, but that method only looks good with transparency textures. Play with the controls a bit - here's an accidental "windswept" look I got while messing with the Gravity Z setting on the head model:
You can also create full heads of hair with the fur plugin, but I'll warn you now, it can take a *large* amount of strands if you create it with lines-only. Even with 2-sided, textured surfaces, it can take a lot of hairs. Also, you can do multiple passes of the hair plugin to get more varied, detailed looks. Important note, though, make sure you change the "Random seed" variable between attempts, or the new hairs will grow right on top of your old ones. Enjoy. |
| All content Copyright © 2006 Dennis Hawthorne, except where explicitly noted supercoldmilk © 2006 Dennis Hawthorne |
||